For those hardy souls who are interested in botanical illustration, I offer the following advice:
I'd first decide what media you're going to work in, pull together the materials, find some tracing and transfer paper to transfer the drawing to your support (canvas, gessoed board, heavy illustration board or hot press watercolor paper), do the drawing, trace the drawing, take another look at the plant (or piece of the plant) you've chosen to draw, to see if it's moved from your original composition and make changes accordingly. Then transfer the drawing onto the support you've chosen, taping your tracing paper onto your support - watercolor paper, drawing paper, gessoed board or canvas, or whatever - with the transfer paper in between. Make sure the side with the graphite imbedded in it is facing down! (it doesn't work the other way, which should seem obvious, but you'd be surprised how many of us make that mistake at least a few times) Oh - light. You need really good light to draw and paint by. I suppose this is a given, but I always feel it's important to mention it. I have an OTT-Light that gives good results and I can draw late into the night. It's color balanced. This is also important.
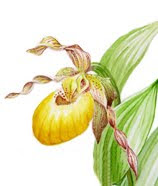
Choice of plant: I'd find a plant I can represent life size. Why life-size? Because you can see all the details easily, you can work close to your plant, you can do one-to-one measuring from plant to paper (or whatever surface you've chosen) with dividers (or a ruler, but I like a simple set of dividers - you can use a compass and just put in its extra point, in the place of the pencil lead, in a pinch). Now, I have to betray my bias here: I think orchids are wonderful for this first sort of initial study. If there's a Home Depot or a nursery near you that has some nice, smaller plants in bloom, that's what I'd try first. (There are also some nurseries which ship blooming plants by FedEx.) The flowers last a few weeks on the plant, at least, they're beautiful to look at, and the lines are clean and uncomplicated. I know for a fact there are many illustrators and teachers besides myself who use them in their botanical illustration classes for just these reasons! : ). And even if the plant doesn't thrive in your care over the years you still have a beautiful drawing or painting to look at afterwards... But if you can't get orchids, don't fret - any attractive flower with good substance should do well for you. Keep it in the fridge (in a zippie bag to hold the entire thing without crushing any parts) when you're not painting it and it will last longer.
Note that plants with fuzzy textures or lots of little leaves are just plain frustrating for a first or second project and you're going to get bogged down in the details. For a first botanical, you don't need that. Draw what you love, and that love will give you the energy and inspiration to do your best work.
I usually do a graphite drawing first. Five values is fine. You need to know where your highlights, darkest darks and the three intermediate values between those are. Work on a pleasing composition, turning the plant around a few times to capture its best aspect, but when drawing, be extremely faithful to what you see in front of you. Be content to give it the time it needs, and be aware that a live plant will move and grow and shift itself around searching for the light. If you keep it in a sunny (tho not harshly so) window it will tend to move a bit less. Notice the grace of the plant, the line of growth, and measure it to make sure it fits comfortably on your page. You could take a photo but personally, I wouldn't. You won't capture the detail, the values will be off, and you'll be using the photo as a crutch. Don't go there this time. The next time around you can play with the form of the plant and the presentation of the blooms on the stalks, but for now, I'd just paint what I see.
After you've competed and transferred your drawing, and you're ready to put paint down, study your greens. There are very very few greens right out of the tube that will match anything you see on any plant. Mix your greens carefully, realizing that the basis color of the leaves (usually yellow, tan or brown; in some deciduous trees it's red) will depend on the species, and that the green you see is from the photosynthesis process. Don't mix too many pigments together, you'll get mud. Keep a simple palette of a cool red, a warm red, a cool blue, a warm blue, a cool yellow and a warm yellow. This will vary depending on your media. There are a few colors you just can't mix, and I have some of those on my palette (I work primarily in watercolor, acrylic ink, colored pencil and computer) too.
I'd probably paint the flowers first, since they're the most fragile. If a flower falls off, take the opportunity to dissect it and draw and paint it (later - put it in a zippie in the fridge for now) on a separate support - paper, whatever. If you have a magnifying glass, use it to appreciate the fine details. Don't make too much of them but make sure you indicate them somehow - botanists want to see that the attachments of the leaves to the stem and the flowers to the stem are accurate. If you're not sure what you see, find a botanist to help. Or take out a botany textbook from the library to go over the parts of plants. Don't get bogged down with this, just use it for simple reference. Brian Capon's Botany for Gardeners is a pretty good reference too. (to be continued)
Subscribe to:
Post Comments (Atom)
1 comment:
Kathy - I love the detailed information you give on your blog... add some images of your paintings. I'm sure people would love to see those as well!
Debbie
Post a Comment